General Installation Tips:
When installing correctly you must ensure that the fluid is not contaminated and the system should be fully flushed out prior to installing the new caliper.
-
To obtain the best results, calipers should ideally be fitted in pairs, as performance will decline over time, and we recommend you replace the brake pads at the same time.
-
Snapping of bleed screws can be common in aluminium calipers due to corrosion on the unit itself, particularly because the screw is quite small in diameter. Special care should be taken with this type of unit. Once snapped, the caliper must be replaced although it should be retained intact for future quality remanufacture.
-
As part of the MoT check, the brake calipers should always be checked for leaks and to ensure that they have not seized and are fully operational. This is particularly important in cases where the customer may have noticed excessive noise, brake judder or lack of brake performance.
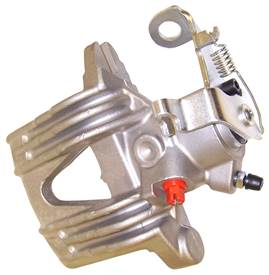
Rear Handbrake Caliper Installation Tips:
 A large number of the technical calls Remy receive relate to the hand brake mechanism on rear calipers. Problems may occur during fitting due to the handbrake lever being moved before correct installation on the vehicle. The handbrake mechanism has been factory set, and should not be moved until it has been fitted to the vehicle.
Please note during fitting of handbrake calipers:
-
After having fitted the brake calliper, the distance between brake pads and brake disc should not exceed 1 mm. If adjustment is required, remove the brake pads and adjust the piston using the correct tool to achieve the correct clearance (do not move the lever).
-
Re-fit the brake pads and re-measure the clearance gap.
-
Re-fit the handbrake cable and adjust it to remove any free play. (Do not move the lever or operate the handbrake!).
-
Bleed the system in accordance with manufacturer’s instructions.
-
Automatic internal adjustment occurs when the foot-brake is applied. It may take several operations of the pedal.
-
Fine adjustment occurs during road testing.
-
Only at this point should the handbrake be tested. Final adjustment of the handbrake cable may be required at this stage.