Bottom End

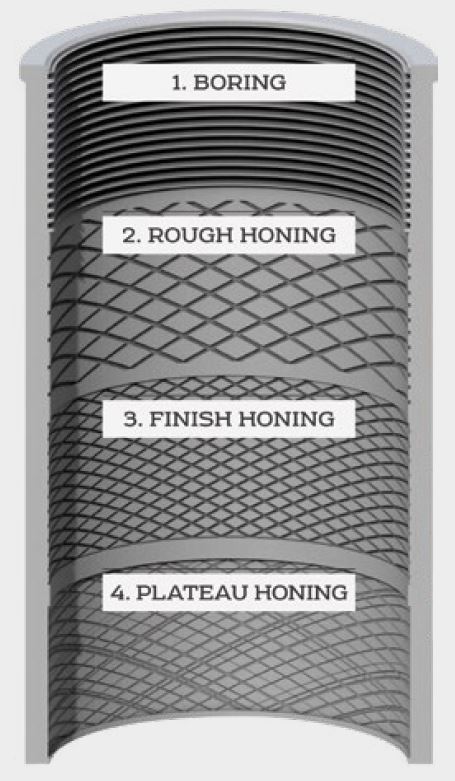
Honing PerfectionFederal-Mogul Engine Expertise shares some insight on honing – the finishing touch for the perfect cylinder bore. Cylinder bore honing is a highly effective way to improve the bottom end of an engine. It is an essential step after an engine re-bore, as a “tidying-up” procedure. Cylinder bore honing is also effectively remedy’s an engine that is over-consuming oil or causing excessive smoke. Federal-Mogul offers an overview of honing and how to accomplish it correctly, first time. STEP-BY-STEP HONING Step 1: Bore the Cylinders The main bearing cap should always be torqued into position. Using correctly sharpened boring tools, it is important to avoid removing too much material. If too much has been removed, it cannot be replaced. Rule of thumb is to leave at least 0.03mm each side for honing. Step 2: Oil it Up Honing needs done be done in several stages to achieve the optimum finish. Honing oil should be continuously applied at all stages to cool the cutting surface, while flushing away debris and maintain the sharpness of honing stones. Use only recommended honing oils – filtered when possible to remove grit and debris. Starting with 70 grit stones to remove 0.04mm, leaving 0.02 for finish honing – at this stage, all boring tool marks would have been removed to achieve a crosshatch finish. Step 3: Working Your Way Down Using 220 grit stones, the cylinder bore needs to be honed down to the required finished size. This involves removing at least 0.02mm of extra bore material from the previous stage. Be sure that the crosshatch angle of 120° is maintained and the bore taper is controlled. Step 4: Plateau Honing To create smooth plateaus for the rings to bed in and seal, peaks from the bore surface need to be removed by honing with 600 grit stones. Once completed, the deeper valleys left after Step 3 can still be seen. These are essential for oil retention, to reduce ring and piston wear. Meanwhile, the plateaus help to control oil consumption through positive ring sealing. For this step, one should hone for at least 30 seconds in each bore – still keeping the cross-hatch angle at 120°. Step 5: Cleaning Up Bores need to be cleaned thoroughly after honing. Hand-cleaning with hot soapy water and a nylon bristle brush work best as solvents or pressure washers are simply not effective enough. A thoroughly clean bore will come out stain-free after a lint-free rag is wiped around the cylinder walls. Step 6: Dry & Coat Dry the bores and coat them with oil. After engine assembly, clean the bores once more to remove any new dust and grit. This creates a honed cylinder which should help the engine to pass any emissions test it takes.
|
Related Articles Related Downloads |