Engine Drive Belts
Micro-V® Belt Installation GuideStep 5 – Check belt and pulleys for wear and dirt
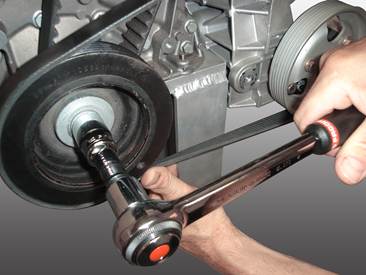
Step 6 – Belt installation Once you have thoroughly checked the drive, install the belt according to the belt routing diagram (see Gates Drive Systems Application catalogue). Carefully align the belt ribs with the pulley grooves and check that the belt is squarely on each pulley. Pulleys that cannot be visually inspected should be felt to ensure proper installation. If not properly installed, the belt can ride up on the pulley or skip grooves resulting in severe belt damage. Step 7 – Apply correct tension If the serpentine drive has an automatic tensioner, slowly release the tensioner and it will automatically apply the right tension. If the car has a locked centre drive, you need to carefully apply the right tension. Too much tension can destroy multi-ribbed belts; too little tension can cause noise, belt slippage and pilling. After having tensioned the belt, let the drive run for a few minutes to ensure proper functioning of the belt and even distribution of the tension along the belt’s length. Applying the correct tension is easy with Gates sonic tension tester STT-1. Each STT-1 comes complete and ready to use with an instruction manual and a user-friendly belt installation guide on CD-ROM. That’s all there is to Micro-V® XF belt removal and installation. When properly installed and maintained, Gates Micro-V® XF belts will ensure many miles of trouble-free performance. |
Related Articles Related Downloads |
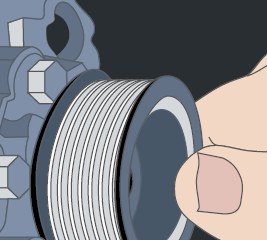 Once you have checked alignment, you can remove the belt. Carefully inspect the entire ribbed area for cracking, chunking and pilling as described in the troubleshooting guide. Clean the pulleys and tensioners with a solvent and check them for signs of abnormal wear. To check the condition, press a small amount of plasticine firmly into the grooves. The edges of the impression should be straight and the tips even with no distorted points.
| Previous page |